
So this is my starting screen and what i need to do is create 1 cylinder for my base of my model and 2 boxes.
 I have then placed them accordingly, some of my images may look different in others as i may have altered the model and other tweaks.
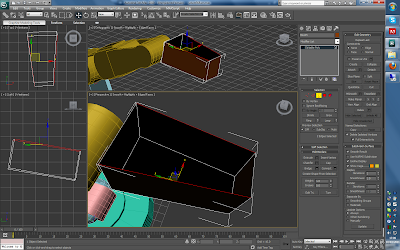
Here i have created a few more blocks for the rest of the robotic arm. After this stage i will start to edit the poly's, i will this by selecting the poly i want to edit, and then right poly in the side bar and turning it into and editable poly.

So here you can see that I have turned this block into an editable poly and starting to curve the edges.
This is achieved by using the chamfer edges tool.
This is achieved by using the chamfer edges tool.

But first i have to selected the edges that i want to chamfer.

Here I've picked edge tool so i can now select the edges of my box.
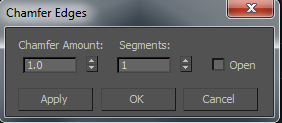
Once I've selected the edges i want to chamfer i then use 'Chamfer Edges'.
I am them presented with this box which allows me to customize how much intensity of the chamfer and how many segments I wish to apply. The more Segments I have the smoother the edge.

Before moving on i want to quickly talk about the other tools that are for use in 3ds Max.
 The border tool wasn't used in the creation of the robotic arm, so i thought this would be a good time to explain it's uses.


Here you can see that the edges that were selected capped gap between them.
Now I extend the size of the base block, making it a little bit bigger you may notice in further images, i have also extruded the centre of the block for detail.

Here I've picked edge tool so i can now select the edges of my box.
Once I've selected the edges i want to chamfer i then use 'Chamfer Edges'.
I am them presented with this box which allows me to customize how much intensity of the chamfer and how many segments I wish to apply. The more Segments I have the smoother the edge.


Before moving on i want to quickly talk about the other tools that are for use in 3ds Max.
 The border tool wasn't used in the creation of the robotic arm, so i thought this would be a good time to explain it's uses.
This is the border tool selected here.
It can be used for filling in gaps which is known as 'Capping' this is a feature exclusive to the border tool and here is an example of what it looks like.


Here you can see that the edges that were selected capped gap between them.

Here i have added more detail extruding the centre of the base cylinder, more cylinders and polygons.
I have edited them again using the poly editor.

To create these parts on the side of the arm, i had to use the cylinder tool and then scale down the face like so:

I then had to create another edge to make the surface more smooth.
To do this i have to select all the edges, using the edge selection tool, i can then make this easier for myself by using 'ring' this will select all the other edges.
Once i had all the edges selected using 'ring' i could then use 'connect' under Edit Edges.


Here you can see that another edge all the way around the cylinder has been created.

Here i have created an instance so i can edit the poly at a straight angle.

I then chamfered the edges on to bottom and top, if you look at the one above these changes have been made as well due to the instance.
After this I created a few more polygons, on to the side of the block mirroring them and then attaching them.

This is what i ended up with once i had finished attaching all the polygons.
All i had to after this was create the parts that connect the body of the robotic arm to the head.

Final result.